How do I use the Host Control Panel?
The Host Control Panel is where you are able to manage all the settings within the webinar room. Control the Chat Panel, view attendee's connection speeds and more.
The Host Control Panel is where you are able to manage all the settings within the webinar room. You can control the Chat Panel accessibility, manage engagement features, view attendee's network connections and more. Learn more below on how to manage and navigate the Host Control Panel.
How to Manage the Host Control Panel
1. Make sure that you are an Admin in the webinar room. Only Admins see the Control Panel.
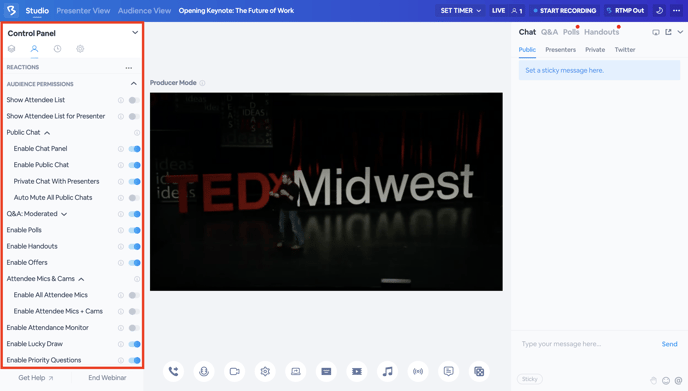
2. The Host Control Panel will be on the far right side of the page.
The Audience tab
Below are details about each feature on the Audience tab.
Show Attendee List: When enabled, attendees can see who is attending/how many people are attending the webinar. When disabled, attendees cannot view this information.
Show Attendee List For Presenters: When enabled, attendees can see who is attending/how many people are attending the webinar. When disabled, attendees cannot view this information.
Enable Public Panel: When enabled, this will allow your webinar to have the chat panel within your webinar. When disabled, the chat panel will be removed from the webinar.
Enable Public Chat: When enabled, hosts and attendees can use the public chat to submit chat messages during the live webinar. When disabled, only hosts can use the public chat.
Private Chat with Presenters: When enabled, hosts and attendees will be able to privately chat with presenters.
Auto-mute all Public Chats: When enabled, this allows the host to see all the chat comments as they are posted, but in order for those comments to be shared and visible to the rest of the room, the host will need to publish each message.
Enable Q&A: When enabled, attendees can submit questions to the Q&A section. When disabled, attendees cannot submit questions and the Q&A section is hidden from the chat window. Please note that the Q&A section is separate from the public chat.
Publish All Q&A: When enabled, attendees can see all of the questions submitted to the Q&A section. When disabled, only hosts can see the questions submitted to the Q&A.
Enable Polls: When enabled, hosts can create polls to send to your attendees. For more information on this feature refer to our more specific help center article on polls via this link.
Enable Handouts: When enabled, hosts can upload handouts for attendees to view.
Enable Offers: When enabled, hosts can have the offers appear as full-screen pop-ups to attendees when the webinar is live.
Enable All Attendee Mics: Allows ALL attendees to be able to share a microphone. (Use this feature with caution!)
Enable All Attendee Mics+Webcams: Allows ALL attendees to be able to share a microphone and webcam. (Use this feature with caution!)
Enable Attendance Monitor: When enabled this will send a pop-up to your attendees to click to ensure that they are viewing your webinar.
Lucky Draw: A gamification feature that will select an attendee from your event’s audience at random to receive a prize.
Enable Priority Questions: Moderators and Admins are able to mark questions as priority for Presenters to prioritize during discussions or events.
Admins: The list of active admins in the webinar. Admins are the only hosts with access to ALL features during the webinar, including the Host Control Panel.
Presenters: The list of active guest presenters in the webinar. Guest presenters do not have access to the Host Control Panel.
- To learn more about the On- and Offstage presenter click here.
Attendees: The list of active attendees in the webinar. Attendees do not have access to the Host Control Panel.
Audience tab: Reactions
When you click on the three dots next to Reactions you will notice that this option can be toggled on or off. The Reactions feature is an interaction that will allow the attendees to send emojis as reactions when the webinar is live.
When the feature is turned on the attendee will be able to send reactions they will be able to find this option at the bottom of the screen. Attendees will only be able to choose one reaction when the feature is turned on.
Get Help and End Webinar buttons
Clicking the Get Help button will taking you to the BigMarker Help Center to help you troubleshoot, ask general questions, or review the system requirements. Clicking the End Webinar button will immediately end the webinar (regardless of the time left) and remove everyone else in the room. You will be asked if you want to redirect them:
Link nội dung: https://mozart.edu.vn/hot-dot-a53247.html
